Friday, 4 March 2011

WIP - SAM Launcher


My current work in progress is a surface-to-air missile launcher.
This model has been a touch more technical than my previous ones, however once you've got the tool usage figured then its just quite a lot of rinsing and repeating, loop and ring functions to get the desired effect looking as close as possible to the reference image as possible.

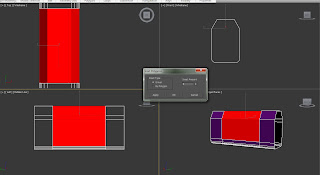
Starting with a box, extrude and scaling the top polygons to get a close approximation of the right shape. Then using the connect edges function to pinch the edges together so I have some faces to bevel and chamfer later on.


Then inserting the polygons on the mid area so I can bevel, move and scale to copy the look as well as I can. As I mentioned before this isn't too difficult if you have a handle on the tool that you have but it can get technical and fairly fiddly with a lot of trial and error to get the shape you are looking for.


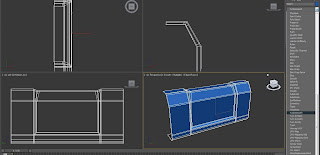
Since it can be a bit time consuming, depending on your preferences it may be easier to work on just one side at a time so I decided to delete one half and just work on a single side, this prevents potential problems later on with artifacts/artifacting.


Adding turbosmooth, with 2 iterations will give you a idea of what the body of the model will look like since i'll be keeping the turbosmooth setting until the end adding them to the overall final model.
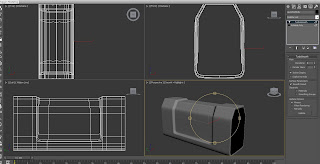


For instance, when I mirrored the side I was working on, when turbosmoothed it produced a smoothed whole model whereas when I done it with just the model normally it produced quite a few artifacts which causes untold problems later on.
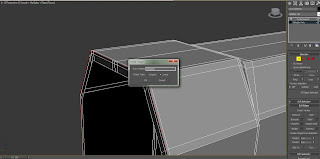


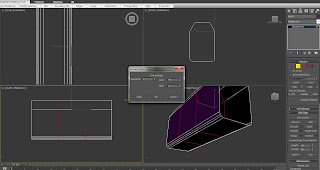
After selecting the outer edge of the model I then had to use create shape since I would be using this part as a front missile plate. It would be helpful to make this the only thing visible, so hide unselected then on to making the front plate using the newly created shape as a outline.
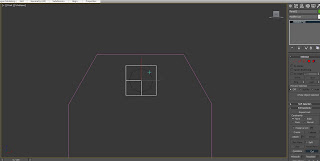


Creating some circle splines with just a few subdivisions so they are hexagonal shaped then, cutting, quick cutting and shift + dragging a few thousand times, these then form my missile ports.
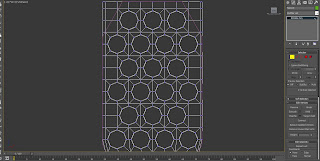


After this, I decided to show all assets in the scene so I could then extrude the back of the missile port to then slot it in the main body. Selecting the corner edges and clicking loop to select them all and scaling them slightly as so it fits snug to the body of the launcher.
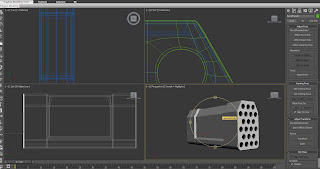


Once this was in place, it was time to make the barrel caps, this was a fairly easy task as it was creatable by just using a simple cylinder, I needed to add a higher amount of sides so the caps had a smoother look. Knowing this would increase the poly count I decided to delete the non-visible faces of the cylinder as so to negate for the increased number of sides.
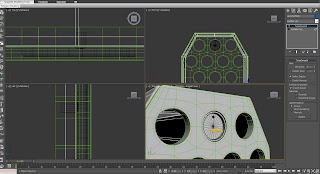
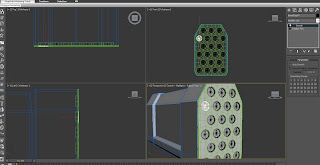


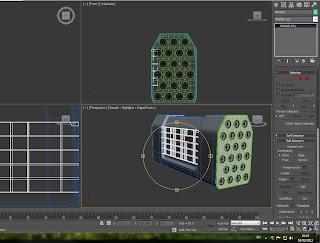
Cloning the barrel caps to fill the all of the holes is a simple task getting them lined up properly and then setting the smoothing group to '1'.

As I mentioned earlier this is a work in progress but it serves the basis for what I am looking to achieve with this model.
Tuesday, 1 March 2011

Belated Bond 'Casino Royale gun barrel scene' screencaps


I chose to start with one of the items that will most likely be at the end of my animation which is the iconic Bond gun barrel sequence. I chose to use the updated Casino Royale sequence which uses a more CG looking barrel with much more smoothing and reflection as opposed to the older sequences.


The procedure was fairly simple being created out of a circle spline and selecting the inner faces using the ring option when on editably poly allows you to choose all the inner facing faces with one click. Then choosing the twist slider on the selected lines allows you to get the barrel-rifling accurate without manually doing it via soft selection and the like.


Adding a camera to a line to allow the camera to pan the length of the barrel in one move is highly useful also.


Then adding a gloss black material to the inner faces of the barrel gives you the rough look of the new Casino Royale sequence but it requires some playing with, since it is really personal preference on the amount of reflection you have coming off of the barrel rifling and how bump mapped they are. Also note the placeholder image, this was purely because I couldn't get a image of Bond looking down a towards the camera to shoot in that trademark scene without a gunbarrel already in shot, I've tried photoshopping it out but the remaining image of Bond is really low quality, I shall have to find another way around this problem but for the time being the picture allows you to see the effect in place.

Actual belated 9mm bullet casing screencaps

Enclosed - The images I said I would deliver on my last post.


Belated 9mm bullet casing screencaps

I needed to make some empty shell casings to have lying on the floor of the safehouse so I had to first find a suitable reference which wasn't difficult however finding one with a reasonable resolution was.

After acquiring the image using the line tool again was how the shell was going to be made, then adding lathe in order to fill out the rest of the shell.


I did have a few tries at this since it seems to be a bit hit and miss when trying to make precice indentations when adding lathe afterwards without it giving you shoddy looking results but sooner or later it just seems to happen.

Since making the bullet casing was fairly simple, I decided to make it into a short animation. I cloned the casing once or twice or seven times and added a rigid body modifier into the scene. In conjunction with reactor will allow the bullet shells to hit the ground, bounce, spin, etc.

However finding the right settings for this is fairly fiddly, none of the values can be too high for the rigid body collection otherwise it will yield some totally awful looking results or probably crash your computer. This is mainly related to the mass slider on the rigid body collection properties menu.

After a while of trying to achieve desired settings, I felt I could get a bit more out of this animation so I decided to add PF Source into the scene for some smoke effects. Now this is where it gets complex, finding the right combination for these settings is serious tricky and impossible if you have no prior knowledge of the partical view window or system in general.

From the screenshot below you can see in the perspective viewport the WIP of my smoke effects but for the following render I had to switch the birth and uncheck renderable on the partical effects since I was using Vray and I did want this to take one thousand hours just to do a single pass of the frame....

EDIT - I've just noticed only one image has bothered to come up so i'll add them all into another seperate post. No idea why, not even close to the file size capacity.
Many apologies.

Belated table and chair screencaps


Many of these screencaps have just been sitting in my pictures library for a while so I best upload and explain in short about them and how I got the desired effects.

I designed this table and chair set initially just as a placeholder but decided I'll be able to work it in to the Bond safehouse/apartment idea with some other models and material editing.

Much of this was made with the line tool. In fact about 98% was made with the line tool, I only used a chamfer box for the base of the seat with FFD 2x2x2 modifier and a cylinder for the tabletop and that was really it.


Although using soft selection sometimes is very useful however sometime tricky when trying to set the correct Falloff rate as so prevent too many points being selected, was it was fairly critical when creating the desired effect for certain points like the armrests on the chairs.


I am fairly please with the way this scene turned out, although I am slightly unhappy with the material for the wood. Specifically relating to the bump map that I applied; it seems to tile far too much on the Y-axis which will need reconfiguring but as a sort of stomach warmer or sea settler it will suffice. Since you can really spend too much time on just one aspect of a scene like the materials or the lighting for example but its probably more ideal to just finish the scene then once everything is in place and you've got at least one render then play about with settings to achieve desired effects.

Another point, using the align tool in conjunction with Shift+Clicking to clone saved me lots of time by just choosing the object I wanted my selected object to align to, then just choosing the axis I want it to be aligned on in this case all I used was the Y-axis in order to get the table legs the even distance from each other.

Belated Moodboard

I decided to use all of the themes from the previous James Bond movies and novels but not choose one of the specific works to do my animation on. So the inital idea I had was a Bond safehouse/apartment...

Wednesday, 2 February 2011

Needz moar RAM.

Just fiddling with about with cloth, adding a plastic sorta texture with different measures for refraction with light. Some very basic bump-mapping on two of the spheres and turning up the luminance to 5700 cd/m to make a glow-in-the-dark cube.

Finishing the render on my interior scene as I type this...


Eyes open.

Out.

EDIT - Just seen how trash the quality of these videos are. I may upload them to youtube later. Then again maybe not.

Also...

Before I forget, I captured a few videos of basic tests I was doing like texture blending and animating with different tangent types. They arn't supposed to be all that informative at current (or interesting), as I say they are just tests, really to see if I can remember how to do all the things I say I can...

Oscar mike.


Well now...

I've had a nice few cups of green tea and a chance to calm myself down since I left university (also, good 3D session today), now I feel like I need to relearn all those skills I gained at college and lost in my absence from it.

A few hours blitzing 3DS Max methinks...I will report back with my results shortly. If I do not return then most likely; i've thrown the computer up in the air due to stress, the computer has exploded and killed me due to some serious CPU overclocking action in order to squeeze some extra frames out of this rig, or i've killed myself due to lack of motivation and to save time at a later stage.

Stay tuned.

Out.

Tuesday, 1 February 2011

Max relax

Well, I'm not going to lie...I'm off down the pub.
But this is only because I've been rendering these 20 frames for the last three hours, bored.
So I'll still kinda be working, sort of, mostly...not really. Whatever, I need a pint, I'm starting to get withdrawal symptoms, shaky hands and clouded judgement n'all that.

Oscar mike.

Wednesday, 26 January 2011

First time in a long time....

After a long, long delay I've finally returned to 3DS Max...the newer versions feel so foreign compared to the old school 2007 edtions that we had to use.

But alas, it's slowly coming back to me. And when I say slowly, I mean slowly. Totally forgot the clone tool even existed but I can still properly set up six omnilights and two target cameras and get passable results...more or less anyway.

Out.